Stitching Inspector
Back to MIB | User interface | Ribbon | Dataset | Stitching
Overview
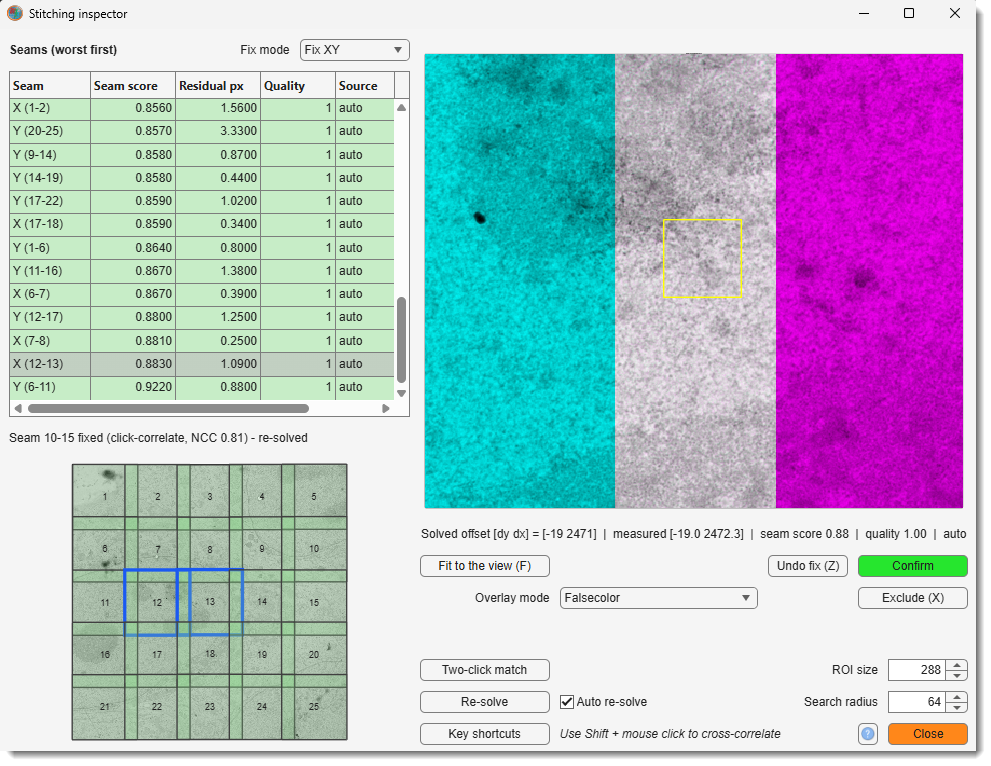
Automatic stitching can fail silently: a measurement that locked onto repetitive content one period off satisfies the solver perfectly, so the quality rating stays green while a tile sits a full period out of place.
The Stitching Inspector re-reads the actual pixels at every solved seam, ranks the seams worst-first, and gives you the tools to correct the ones the automatic pass got wrong - by clicking a landmark, dragging the overlay, or matching two points.
Open it with in the Stitching window - enabled once Measure overlaps and Optimize positions have run. Both windows stay open and usable side by side. The overlay mode, Fix mode, ROI size, search radius and Auto re-solve are remembered until MIB is closed.
The review loop
The inspector is built around one repeated cycle: look at the worst seam, decide, move on.
-
Read the top of the table. It is the seam whose pixels agree least at the solved placement. → The seam table
-
Judge it in the pair view. In the default Falsecolor (cyan/magenta) overlay, aligned structures come out white; a misalignment splits into cyan and magenta ghosts. Space (in Flicker mode) is the fastest way to see a small shift. → The pair view
-
Decide. If the seam is fine, marks it reviewed and jumps to the next worst. If it is wrong, fix it. → Reviewing the ranking, Fixing a bad seam
-
Let it re-solve. With on (default) every fix immediately re-solves all positions, re-scores and re-ranks, so the table always shows what is worst now. → Re-solving
-
Stitch. When the top of the list is green, press in the Stitching window. → Fusing and saving
Work top-down and stop early
The ranking is a work queue, not a checklist. Fixing the worst seam usually moves several tiles, so the seams below it are re-scored and often sort themselves out. Re-read the top of the table after each fix rather than working down the rows in their original order.
The seam score
Every tile pair is scored by how well the actual pixels agree at the solved placement: the two overlap strips are re-read from disk and cross-correlated, giving a number from 0 to 1. The ranking, the row colours, the mini-map tint and the alignment chip in the main window all come from this one measurement.
Why the pixels and not the solver residual
The residual asks "do the measurements contradict each other?". That question can only be answered where the seams form a loop - in a 2x2 mosaic you can walk 1 → 2 → 4 → 3 → 1, so the four measurements have to add up.
A single row or column of tiles has no loop: each tile is held by one seam only, so every measurement is honoured exactly and the residual reads ~0 no matter how wrong they are. The same is true locally in any sparse layout.
The pixel score has no such blind spot. It does not care where the number came from - it looks at the two tiles where they are now and asks whether the structures line up. A measurement that locked one texture period off scores badly here even when the solver is perfectly happy, which is exactly the failure this tool exists to catch.
The seam table
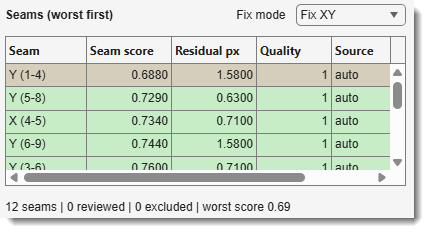
Each row of the Seams (worst first) table is one measured seam (tile pair), in six columns.
| Column | Meaning |
|---|---|
| Seam | axis + tile pair, e.g. X (2-3) for an in-plane seam or Z (8-9) for a cross-layer one. |
| Seam score | pixel agreement of the two tiles re-read at their solved placement, 0-1, higher is better. Drives the ranking and the row colour: green >= 0.7, amber >= 0.4, red below, grey when excluded. |
| Residual px | how far the global solve's placement differs from what this edge's own measurement asked for. Small means the solve matched this measurement; large means other seams and springs pulled the tile away from it. |
| Quality | the registration confidence recorded when the seam was measured, before any solve ran - also the weight the solver gave it. It answers "how sure was the automatic pass", not "is this seam aligned now". |
| Source | auto (untouched automatic measurement), confirmed (reviewed and accepted as-is), or user (repositioned by a manual fix). |
| Used | yes, or EXCLUDED when the seam has been toggled out of the solve. |
High Quality with a low Seam score is the dangerous case
That combination means the automatic pass was confident and wrong. It is precisely what the residual cannot see and what this inspector was built to find. Treat such a row as a fix, not as a borderline call.
The table shows one kind of seam at a time
In-plane seams (X, Y - tiles side by side within one Z-layer) and cross-layer seams (Z -
tiles in adjacent Z-layers) read on different axes, so mixing them in one ranked list was
confusing. The table therefore follows the
dropdown:
- Fix XY lists the in-plane seams,
- Fix Z the cross-layer ones.
Every navigation - Down / Up, Confirm and advance, a mini-map click, a re-solve - stays inside the shown subset.
A 2D mosaic has only in-plane seams, so its Fix Z table is empty. So is that of a mosaic of Z-stacks that all sit on one layer: there are no cross-layer seams to list, but the Fix Z boundary view still works, because it aligns mosaic slices rather than seams.
What the status line reports
Between the table and the mini-map: 12 seams | 0 reviewed | 0 excluded | worst score 0.69.
Note that it counts all seams, not just the ones the current Fix mode lists. Reviewed counts
seams marked confirmed or user; worst score is taken over the seams still in use, so
excluding a bad one changes it.
It reads worst score not checked when no seam carries a score - the scoring pass never ran, or it was cancelled, which discards the partial result rather than rating the mosaic on its better half. Press to get the scores back.
The same line doubles as the feedback area: after each action it says what happened ("snapped by 3.4 px", "match too weak - nothing moved", "nothing to undo on this seam").
The mini-map
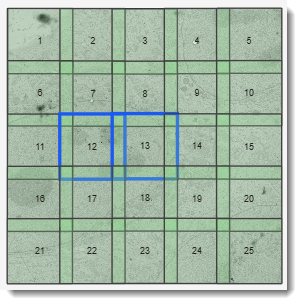
The layout drawn at the solved positions, each tile tinted by its worst seam (green → red, grey when all its seams are excluded), with the current pair outlined in blue.
The fused preview is the cheapest sanity check there is
Unless the tiles are very large, a low-res fused preview is composited behind the colouring at the current solved positions, and it is redrawn after every re-solve. A tile placed a whole field of view out of position is obvious there in a way that no number in the table can convey - look at the mini-map first whenever a rating disagrees with your expectation.
One Z-layer at a time
A multi-layer mosaic stacks every layer at the same XY, so drawing them all would overlap the boxes and merge the labels. The mini-map therefore shows only the layer of the current seam (the lower tile of a cross-layer pair), and names it in the title when there is more than one. Selecting a seam in another layer moves the map with it.
The pair view
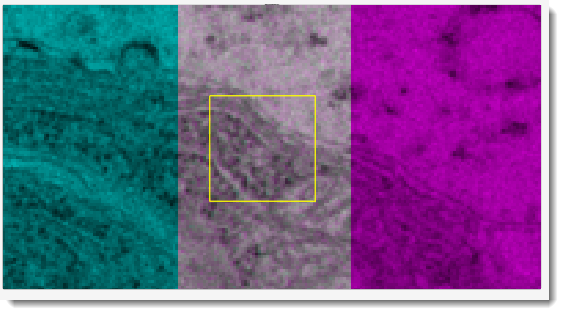
The complete tile pair composited at the solved offset - not just the overlap strip, so a tile that is badly out of place is still visible and still fixable. Large tiles are downsampled for display only; every fix is computed at full resolution.
Which tile is which colour is stated in the axes title (e.g. Cyan: tile 2; Magenta: tile 4 (on top)), along with the browsed slices on 3D pairs. The tile on top - the one Overwrite blend mode keeps in the mosaic, see Tile order - is always the magenta (or red) one.
Overlay modes
| Shows | Best for | |
|---|---|---|
| Preview final | the pair as will produce it, with the current blend mode, tile order and intensity correction | deciding which tile should be on top |
| Falsecolor (cyan/magenta) (default) | the tile on top in magenta, the other in cyan - aligned structure adds up to white, misaligned structure splits into coloured ghosts | judging alignment at a glance; the mode to work in |
| Falsecolor (green/red) | the tile on top in red, the other in green - aligned structure comes out yellow | the same, in the colour pair some eyes separate better |
| Flicker | one tile at a time, Space toggles | small shifts - the eye catches a 2 px jump between two flickering images far better than a colour fringe |
| Checkerboard | alternating squares from each tile | whether structures continue across the changeover |
| Difference | the intensity difference of the two | a quick look at brightness disagreement as well as misalignment |
Tile order
Where tiles overlap, the Overwrite blend mode keeps only one of them.
Move up and move down step past the nearest tile the moved tile actually overlaps, so every choice changes something visible; moves that would change nothing are greyed out. The order is used by and saved with the project; it moves no tile and changes no seam score. It has no effect with the other blend modes, which mix the tiles.
Until you change it, the tile imaged first is on top when Re-exposure damage correction is selected, so overlaps show the undamaged copy; otherwise the tile with the higher number is.
Zooming and panning
- Mouse wheel zooms at the cursor. The zoom is kept through nudges, drags and fixes of the same seam, so you can work zoomed in; it resets when you move to another seam or press .
- Hold
and drag to pan. Panning is deliberately on the right button so it works identically in every mode - Fix XY, Fix Z, two-click - and can never be mistaken for a tile-moving drag.
The readout
Directly under the pair view, one line describing the seam on screen:
- Solved offset - where the pair actually sits after the global solve.
- measured - what this seam's own measurement asked for. A large gap between the two is the same information as the Residual px column: other seams outvoted this one.
- seam score, quality, source - as in the table, for the seam on screen.
- On 3D pairs, dz is appended - and if the pixels prefer a different one, so is a hint such as pixels prefer dz+2.
Reviewing the ranking
- marks the current seam reviewed and jumps to the next worst unreviewed one.
- removes its measurement from the solve.
- recomputes all positions and re-ranks.
- Down / Up step through the ranking without changing anything - one row down or up the table, as in any list.
Review decisions are saved with the project file and survive re-measuring.
What Confirm does, and what it does not do
Confirming is bookkeeping only: it records that a human looked at the seam and accepted it, which is what lets Confirm and advance skip it afterwards, and it is what the file remembers.
It deliberately does not change the seam's weight in the solve. The automatic measurement
was already trusted in proportion to its quality, and your agreeing with it adds no new
information - only an actual fix does, and only a fix is promoted to user.
Exclude is a toggle, and it withdraws a fix
While a seam is excluded the button stays pressed and turns red, reading Excluded (X); press
it (or X) again to put the measurement back. The seam's Used column reads EXCLUDED and
its row greys out to match.
Excluding is the coarse option: with no measurement, the pair is held near its nominal
position by the springs, which is better than a wrong measurement but worse than a proper
fix. Note that excluding a seam you had fixed withdraws that fix - the
seam returns to auto provenance, because a user seam is never pruned and the two states would
otherwise contradict each other. Re-including it brings back the automatic measurement, not
your fix.
Re-solving
With on (default), every fix immediately re-solves all positions, re-scores and re-ranks - work worst-first until the top of the list is green.
Turn Auto re-solve off on a large mosaic
Each re-solve re-reads every overlap to re-score it, which is the slow part. Unticking lets you fix several seams and pay that cost once, at the end.
While a fix is waiting, the alignment chip in the main window reads Seams edited / Rating stale until re-solved / Re-solve now, or just Stitch. It means the tiles have not moved yet: your fix is stored, but the positions still come from the previous solve, so the rating on display describes the old mosaic.
Both ways forward are safe - press to apply the fixes now and see the updated rating, or simply press , which always applies a pending re-solve before fusing. Closing this window does not cancel the pending fix: it belongs to the mosaic, not to the inspector, and the chip keeps warning until it is applied.
Fixing a bad seam
A fixed seam becomes a high-weight user measurement: the solver never prunes it, never demotes it, and it survives a re-measure. Pick whichever tool fits how wrong the seam is.
Hold Shift and click a landmark
The strongest tool, and the one to reach for first. You point at where to look; MIB finds exactly where it lines up.
While Shift is held, the cursor becomes a box showing precisely the region that will be used. On click, that box is cut from the first tile and cross-correlated against the second, and a confident peak snaps the pair to sub-pixel alignment.
- - the edge length of the box in pixels. Resize it live with Shift + mouse wheel. On small tiles keep it smaller than the overlap region.
- - how far around the current offset the box is searched, per side.
A weak or ambiguous match only reports why, and never moves the tile. That is the point: the tool declines rather than guessing, so a snap that happens is one you can trust. If it keeps declining, aim at a distinctive feature rather than flat background, or enlarge the ROI.
Drag the overlay
A click that does not move is deliberately a no-op - stray clicks never move a tile.
Two-click match
is for offsets beyond any search radius - a tile locked a whole texture period off, or a tile in the wrong grid cell entirely. Both full tiles are shown side by side; click the same landmark once in each, and the difference between the two clicks becomes the offset, sharpened by a local correlation around it.
Press the button again (or navigate away) to cancel.
Undo
Z or restores the seam's original automatic measurement - measurement, quality, validity and provenance alike - undoing every fix applied to it this session, not just the last one.
Note
Undo is in-memory only. A project file saves whatever state was current when you saved it, so a fix that was saved and then undone comes back on load.
3D: browsing slices and the Fix mode
3D pairs are shown one slice pair at a time, browsed with Q / W - previous / next, the same keys as the main MIB window (Shift = 5 slices). Browsing is always view-only, in both fix modes; it never moves a tile.
Slices are on Q/W; the arrows walk the seam list
Unlike the main MIB window, Down / Up here move through the seam table, not through the stack. The arrows point at rows because that is what the left half of this window is: a ranked list you work down.
The dropdown decides what a fix edits.
(default) The ordinary in-plane offset of the current seam. Both tiles browse together, aligned by the current Z relation, so you can check the seam on any slice and fix it there with the usual tools.
The seam table lists the in-plane seams while this mode is selected.
For checking that each mosaic slice continues the slice below it.
The view shows one tile at two consecutive slices - slice z-1 in cyan and slice z in magenta, fully overlapping, so the image is mostly white when the mosaic is aligned in Z. Q / W moves the boundary through the stack.
Where the two slices jump apart (cyan/magenta ghosting), drag the magenta slice onto the cyan one, or hold Shift and click a landmark for the same sub-pixel correlation as in XY.
The fix shifts that slice and every slice above it, across the whole mosaic - the slices below stay put. The readout names the boundary, the shift, and which boundaries already carry a correction.
Fix Z is not a seam fix, and does not re-solve
Fix XY edits a seam between two tiles, so it feeds the global solve and the tiles move. Fix Z edits the mosaic itself: it records that output slice z and everything above it shifts by a given amount relative to the slices below.
Nothing in the tile graph changes - the solved positions are untouched and no re-solve is involved. The corrections accumulate per boundary, are applied by when the mosaic is fused, and are saved with the project. Z removes the correction at the boundary on screen.
On a 2D dataset the mode stays at Fix XY
There are no Z slices to align, and a dialog says so. For deeper, non-rigid per-slice registration use the Alignment tool on the fused dataset.
Mouse reference (pair view)
| Action | Effect |
|---|---|
| Moves tile j over tile i (Fix Z: the magenta slice over the cyan one); release applies the fix | |
| Nothing - stray clicks never move a tile | |
| Shift + hover | Shows the correlation ROI box at the cursor (no click needed) |
| Shift + |
Click-to-correlate: cuts the ROI box and auto-snaps to a confident sub-pixel match |
| Shift + wheel | Resizes the correlation ROI box |
| Wheel | Zooms the pair view at the cursor |
| Pans the view (no zoom change); clamped to the rendered tile extent | |
| Opens the tile order menu (not in the Fix Z view) | |
| Sets a landmark point on whichever tile was clicked |
Elsewhere in the window:
| Control | Effect |
|---|---|
| Jumps to review the seam nearest the click point | |
| Selects that seam for review |
Keyboard shortcuts
| Shortcut | Effect |
|---|---|
| Enter | Confirm the current seam and jump to the next worst unreviewed |
| X | Exclude / re-include the current seam from the solve |
| Down / Up | Next / previous seam in the ranking - one row down / up the seam table |
| Q / W | Browse Z slices (Shift = 5); always view-only, in both Fix XY and Fix Z |
| Z | Undo the fix on the current seam, restoring the original automatic measurement (Fix Z: removes the boundary correction on screen) |
| F | Fit the pair view, resetting the mouse-wheel zoom |
| Space | Flicker A/B (Flicker overlay mode) |
The keyboard never moves a tile
Every positional edit is made with the mouse - drag, Shift + click, or two-click match. The arrow keys move between seams and Q / W browse slices, in both fix modes, so a keystroke can never silently alter an alignment you were only looking at.
Fine adjustment is what Shift + click is for: it is sub-pixel and works on both axes at once, which no arrow key could match.
opens this whole list - mouse, Shift + mouse and keyboard alike - as a pop-up, so it is available without leaving the dialog.
Fusing and saving
To bake the corrections into a mosaic, press in the Stitching window; to keep them on disk, press there.
The inspector has neither button of its own. It edits the stitch in place, so the parent window's buttons already see every fix - both windows stay open and usable side by side, and a copy here would only be the same action under a second name.
Nothing has to be handed over first:
- Save project always carries the current state, including fixes made a moment ago.
- Stitch runs any pending re-solve before fusing, so the mosaic is never built from stale positions - even if this window has been closed in the meantime.
Back to MIB | User interface | Ribbon | Dataset | Stitching