First Dataset
This walkthrough takes you from an empty MIB window to a loaded, navigable dataset with your first segmentation. It assumes MIB is already running.
New to the terminology?
A quick read of Basic concepts (layers, dataset types, models) will make the steps below clearer.
Explore the Tip of the Day
Each time MIB starts it shows a Tip of the Day window highlighting a feature you may not know about. Browsing a few of these is one of the quickest ways to discover what MIB can do and find out about other nuances.
1. Choose a working directory
Point MIB at the folder that holds your images. You can:
- use the button in the Home ribbon
- use the working-directory widgets in the Status Bar

- simply drag and drop image files onto the image document - the working directory updates automatically.
Drag and drop can crash MATLAB
Because of a bug in MATLAB itself, dropping a file onto the image document occasionally brings down the whole MATLAB session without warning, losing anything unsaved. The fault happens inside MATLAB's own native drag handler, before MIB is told about the drop, so MIB cannot catch it or warn you first.
It is intermittent and seems to accumulate: a drop often works, and it is a later one that fails. Binary files trigger it more readily than plain text.
If it happens to you more than rarely, stop using drag and drop and open files with the button or the Status Bar widgets above instead. Both reach the same place by a route that does not involve the drag handler.
2. Find your files
The files in the chosen folder appear in the Directory Contents panel. Use the dropdown to narrow the list to a given format.
Choosing a reader
The reader dropdown beside it decides which library opens the files, and which extensions Filter offers:
- - MIB's own native readers.
- - the Bio-Formats library, which is how the wide variety of proprietary microscopy formats are opened.
- - for whole-slide images. This one needs an extra MATLAB support package, Medical Imaging Toolbox Interface for Whole Slide Imaging File Reader (Home tab → Add-Ons → Get Add-Ons, then search for Whole Slide Imaging File Reader). Without it, opening a file with this reader fails with an error naming the package.
See the Directory Contents panel for details.
3. Select and load
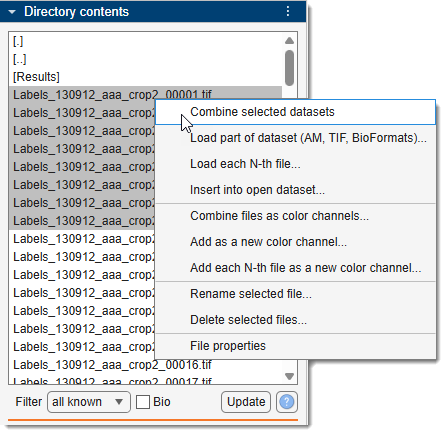
- Select files with
, or multiple files with Ctrl + and Shift + . and choose Combine selected datasets to load them as a single 2D/3D/4D dataset.
A single file can also be opened by double-clicking it.
4. Adjust the display
Press in the View Settings panel to tune brightness, contrast, and visible color channels . This changes only how the image is shown - the pixel data is untouched.
5. Navigate
- Pan the image using
. - Scroll the mouse wheel to move between slices.
- Press W to zoom in and Q to zoom out.
- See all customizable bindings on the Key and mouse shortcuts page.
6. Make a model
Painting becomes a result only once it is stored in a model, so create one before you segment.
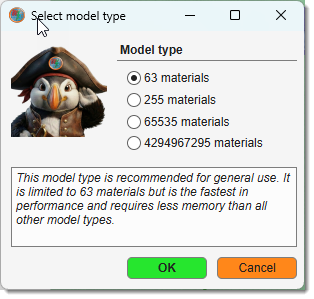
- Press in the Segmentation panel and choose how many materials the model may hold. 63 is the default and the right choice for most work.
- Press above the segmentation table to add a material - one per structure you intend to segment. Double-click a material in the table to rename it.
If a model is already open, asks before replacing it - the existing model is deleted, so save it first if you want to keep it.
7. Make your first selection
Pick a tool in the Segmentation panel - for example the Brush - and paint over a structure. Then transfer the selection into the model:
- A - add the selection on the current slice to the active material,
- Shift+A - add the selection on all slices.
Your result is now stored in the Model layer, ready to save or analyse.
8. Save the model
Remember to save the model
The model lives in memory until you save it (unless you are working in the BigData mode), and nothing writes it to disk for you. Save early and often - segmentation is slow to redo.
- Ribbon → Model → Save model writes it
without asking anything, to
Labels_<name of the dataset>.model(or wherever it was last saved or loaded from). This is the one to repeat as you work. - Ribbon → Model → Save model as...
prompts for a name and a format: the native
*.model, or Amira, IMOD, NRRD, TIF, PNG, STL and OME-Zarr v3 for other programs.
The Quick Access Bar carries a Save model button that does the same as Save model.
Where to go next
- Basic concepts - layers, dataset types, and models explained.
- Tutorials - step-by-step guides and video demonstrations.
- User Interface - full reference for every panel and ribbon tab.
Back to MIB | Getting started