Crop Dataset
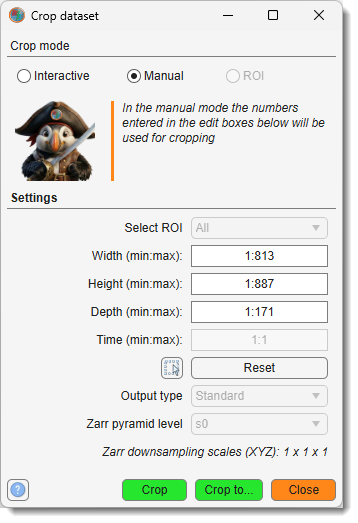
Crop the image and corresponding Selection, Mask, and Model layers.
Cropping can be done in:
- Interactive
- Manual
- ROI mode
Interactive mode
When the Interactive mode is selected, you can draw a rectangular area on the image
by pressing and holding the
Manual mode
Alternatively, enable the mode to enter specific cropping coordinates directly in the dialog.
The  button takes those coordinates from the
image: draw a rectangle exactly as in the Interactive mode and, instead of cropping,
its coordinates are placed into the edit boxes. The dialog switches to the Manual mode,
so that the area can be adjusted before cropping.
button takes those coordinates from the
image: draw a rectangle exactly as in the Interactive mode and, instead of cropping,
its coordinates are placed into the edit boxes. The dialog switches to the Manual mode,
so that the area can be adjusted before cropping.
ROI-based cropping
You can also crop based on a selected region of interest by enabling the mode, which uses ROIs defined in the ROI panel.
Start cropping
To perform the crop, click the button to
crop the current dataset.
Alternatively, use the
button to copy the cropped dataset
to another buffer. Buffers are managed via the buttons at the top of
the Datasets panel.
Note
To restore a cropped dataset into the original, use the Fuse into existing mode of Dataset Chunking → Stitch dataset available at Ribbon → Home → Dataset Chunking → Stitch dataset.
BigData datasets
When the active dataset is a BigData (OME-Zarr v3 pyramidal) dataset, additional controls become available in the Settings panel of the Crop dialog.
Only the requested region is read, so cropping a small area of a very large or remote dataset costs no more than the area itself.
Note
Cropping a BigData or Virtual dataset cannot be undone. Crop into another container from the dropdown to keep the original.
Zarr pyramid level
The dropdown selects which resolution level of the pyramid is used as the source for the crop region. Level s0 is the full-resolution data; s1, s2, … are progressively downsampled versions (e.g. s1 is typically 2× downsampled in XY).
The label below the dropdown shows the corresponding voxel downsampling factors
(XYZ) for the selected level, e.g. Zarr downsampling scales (XYZ): 2 x 2 x 1 for s1.
Tip
Choosing a coarser pyramid level (s1, s2, …) produces a smaller in-memory dataset but with proportionally larger voxel sizes.
Output type
The dropdown controls what format the cropped data is saved in. It is enabled only when the source dataset is BigData.
Standard
The cropped region is loaded from the selected pyramid level into memory as a Standard (in-memory) dataset. The resulting dataset resides entirely in RAM and can be worked on with all standard MIB tools.
The voxel size of the output reflects the selected pyramid level - cropping at s1 doubles the voxel size relative to s0.
BigData
The cropped region is written to a new OME-Zarr v3 pyramid on disk. A file-save
dialog appears to choose the destination .zarr3 folder.
Warning
A confirmation dialog is shown before the file picker because this operation writes a new pyramid to disk and replaces the dataset in the destination buffer.
Output files created:
| File | Contents |
|---|---|
<name>.zarr3 |
OME-Zarr v3 image pyramid (always written) |
Labels_<name>.zarr3 |
Packed segmentation model pyramid - only created when a BigData model exists in the source dataset |
The model pyramid (Labels_<name>.zarr3) is written at full resolution (s0) and all
coarser levels are derived automatically. Material names, colors, and material count
are copied from the source model.
After writing, the cropped BigData dataset is loaded into the destination buffer automatically. If a model was written, it is attached to the buffer immediately - no manual model loading is required.
The output zarr3 file is highlighted in the Directory Contents panel after the operation completes.
Note
The source BigData file on disk is not modified or deleted. Only the destination buffer is updated.
Back to MIB | User interface | Ribbon | Dataset