Image Document
The Image Document is the central workspace in MIB3 where datasets are displayed and interacted with. Each open dataset occupies its own document — a dockable, tabbed window within the MIB application frame.
MIB2 comparison
In MIB2 the equivalent component was the fixed Image View Panel. MIB3 replaces it with a multi-document (MDI-style) design: each dataset lives in its own document tab that can be docked, floated, or arranged in a split-panel layout side by side.
Overview
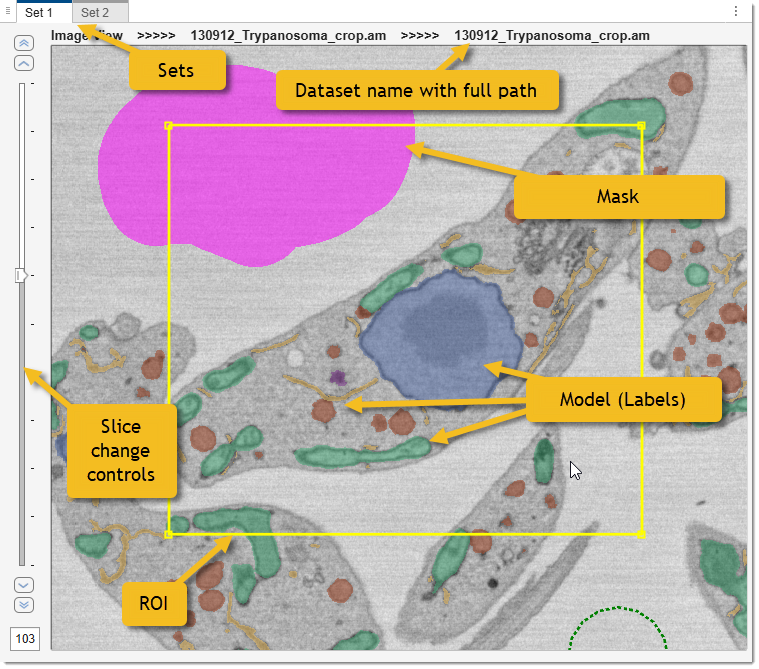
An Image Document showing multiple overlaid layers. Navigation controls run along the bottom.
Each Image Document consists of:
- Image view axes — the main viewing area, rendering the current slice with all visible layers.
- Z navigation — slice controls on the left side (hidden for single-slice datasets).
- T navigation — time-frame controls on the bottom of the panel (hidden for single-frame datasets).
The document title bar shows the set name while additionally informs about the dataset index and its filename in a tooltip upon hovering with mouse
MIB organises open datasets in a two-level hierarchy
- A set is a named group that holds up to 10 datasets (buffers). Sets are created and managed in the Dataset panel.
- A buffer is one of the up to 10 dataset slots inside a set. Switching between buffers within the same set is fast and does not reload data from disk.
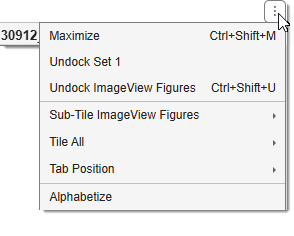
A context menu at the right top corner gives access to variety of options to arrange the sets including a possibility to completely undock the set from the main MIB window.
Documents can be:
- Tabbed — stacked behind each other and selected by tab.
- Split — tiled side by side to compare two datasets simultaneously.
- Floating — undocked into a separate window.
Image layers
The image axes display multiple layers simultaneously:

- Image — the raw grayscale or multichannel data.
- Labels (model) — segmented materials or a difference map for correlation analysis. See Image Layers for details.
- Mask — a binary support layer that extends operations on the Labels layer: it can be combined with materials via union, intersection, and subtraction, and it can be used to limit segmentation tools to the masked area only. The Mask is also used as a seed region for local thresholding with the BW Thresholding tool.
- Selection — a temporary layer modified during segmentation before being committed to Mask or Labels.
- ROI — Regions of Interest overlaid when ROI mode is active.
Adjust layer colors and transparency with sliders in the View Settings panel or via Ribbon → Home → Preferences → Colors and styles.
Z navigation (slices)
Controls for scrolling through Z-slices appear at the panel left side. They are hidden when the dataset has only one slice.
| Control | Action |
|---|---|
| First | Jump to slice 1 |
| Prev | Go to the previous slice |
| Z slider | Drag to scrub through slices |
| Next | Go to the next slice |
| Last | Jump to the last slice |
| Type a slice number and press Enter |
Slider step size
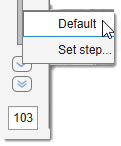
- Default — reset step to 1 (normal) and 10 (Shift).
- Set step… — enter custom step values for normal and Shift scrolling.
The same step is used by the mouse wheel and keyboard arrow keys.
T navigation (time frames)

Controls for stepping through time points appear at the bottom right. They are hidden for single-frame datasets.
| Control | Action |
|---|---|
| Type a frame number and press Enter | |
| First | Jump to frame 1 |
| Prev | Go to the previous frame |
| T slider | Drag to scrub through frames |
| Next | Go to the next frame |
| Last | Jump to the last frame |
Mouse actions
| Action | Effect |
|---|---|
| Move mouse | Pixel coordinates and intensity shown in the Status Bar |
| Segmentation action for the active tool in the Segmentation panel | |
| Pan the image | |
| Ctrl + |
Erase from the current selection |
| Mouse wheel | Change slices (scroll mode) or zoom in/out centred on cursor (zoom mode) |
| Shift + Mouse wheel | Navigate 10 slices at a time (adjustable via slider context menu) |
| Alt + Mouse wheel | Navigate time frames (requires Preferences → User interface → Alt with scroll wheel) |
| Ctrl + Mouse wheel | Adjust brush / tool size by ±1 |
| Ctrl+Shift + Mouse wheel | Adjust brush with bigger increments / tool size by ±5 |
Mouse wheel behavior (slice scroll vs. zoom) is set in Ribbon → Home → Preferences → User interface.
Left/right mouse button swap
Pan and select operations can be swapped in Preferences → User interface → Left mouse button —
setting it to Pan makes
Important key actions
| Key | Action |
|---|---|
| W | Zoom in towards cursor |
| Q | Zoom out from cursor |
| Up | Next slice |
| Down | Previous slice |
| Right | Next time frame |
| Left | Previous time frame |
| Ctrl + F | Find material index under the cursor |
Customize shortcuts in Ribbon → Home → Preferences → Keyboard shortcuts.
Full list: Key and Mouse Shortcuts.
Drag and drop
Files can be loaded by dragging them directly from a file explorer onto the Image Document:
| File | Result |
|---|---|
| Image files | A dialog asks whether to load the file as a new image dataset or as a labels model |
.model files |
Loaded as a labels model |
.mask files |
Loaded as the mask layer |
.ann files |
Loaded as annotations |
Back to MIB | User interface