Selection Panel
Overview
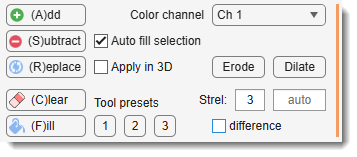
The Selection Panel provides tools to manipulate the Selection layer, one of three key segmentation layers in MIB (Model, Selection, Mask). This layer works in combination with others for tasks like adding, subtracting, or refining segmentations. Learn more about these layers in Data Layers of MIB.
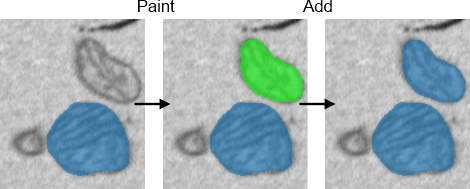
The button
Adds the Selection layer to the chosen Model or Mask layer, as selected in the
Add to column in the Segmentation table of the Segmentation Panel.
Shortcuts
- A: add for the current slice only.
- Shift + A: add for all slices in the dataset.
- Shift + Alt + A: add for all slices, including the time dimension.
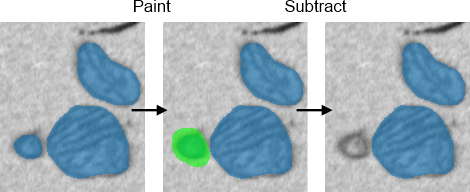
The button
Subtracts the Selection layer from the chosen Model or Mask layer,
as selected in the Add to column in the Segmentation table of the Segmentation Panel.
Shortcuts
- S: subtract for the current slice only.
- Shift + S: subtract for all slices in the dataset.
- Shift + Alt + S: subtract for all slices, including the time dimension.
Possible usage combinations
| Select from | Add to | Fix Selection to Material | Masked area | Result of subtraction |
|---|---|---|---|---|
| Any | Mask | OFF | OFF | Mask - Selection |
| Material | Mask | ON | OFF | Mask within selected material - Selection |
| Any | NOT Mask | OFF | OFF | All Materials - Selection |
| Material | NOT Mask | ON | OFF | Selected material - Selection |
| Material | NOT Mask | ON | ON | Selected material within the Mask - Selection |
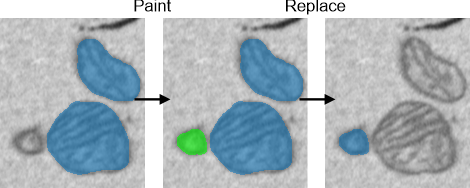
The button
Replaces the material or mask
selected in the Add to column in the Segmentation table of the Segmentation Panel.
with the Selection layer contents.
This is sensitive to the
checkbox in the Segmentation panel.
Shortcuts
- R: replace for the current slice only.
- Shift + R: replace for all slices in the dataset.
- Shift + Alt + R: replace for all slices, including the time dimension.
The button
Clears the Selection layer.
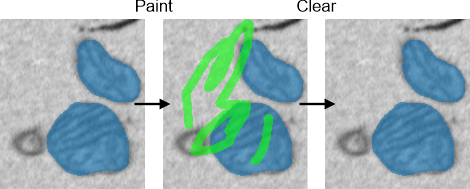
Shortcuts
- C: clear the current slice only.
- Shift + C: clear Selection for all slices in the dataset.
- Shift + Alt + C: Clear Selection for all slices, including the time dimension.
The button
Fills holes in the Selection layer.
This can happen automatically if is checked.
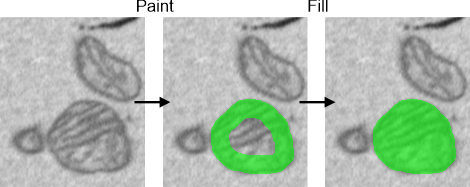
Shortcuts
- F: fill holes for the current slice only.
- Shift + F: fill holes for all slices in the dataset.
- Shift + Alt + F: fill holes for all slices, including the time dimension.
The button
Performs binary erosion (shrinkage) on the Selection layer using MATLAB's imerode function,
with the size set in the edit boxes.
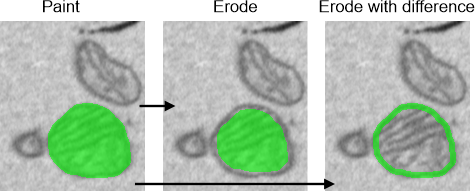
Shortcuts
- Z: erode Selection for the current slice only.
- Shift + Z: erode Selection for all slices in the dataset.
- Shift + Alt + Z: erode Selection for all slices, including the time dimension.
Tip
- Enable for 3D erosion.
- Check to get the difference between the current and eroded selections.
How erosion is computed
- Small sizes use MATLAB's imerode with a disk (2D) or ball (3D) element.
- Large sizes (radius above ~5 px) automatically switch to a distance-transform method. It gives an identical result for round elements but runs in near-constant time regardless of size, avoiding the extreme slowdown of very large elements.
- 3D on non-cubic voxels: a dialog lets you choose:
- Accurate — a true ellipsoid matched to the voxel proportions (physically round), but slower for large sizes.
- Fast — treats the element as a sphere; almost identical when voxels are close to cubic, but shrinks too much along Z when they are strongly anisotropic.
- Tip: for accurate results with large sizes, several smaller steps usually work better than a single large one.
The button
Performs binary dilation (expansion) on the Selection layer using MATLAB's imdilate function, with the size set in the edit boxes.
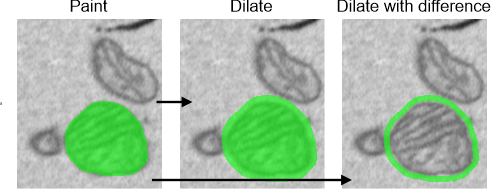
Shortcuts
- X: dilate Selection for the current slice only.
- Shift + X: Dilate Selection for all slices in the dataset.
- Shift + Alt + X: Dilate Selection for all slices, including the time dimension.
Tip
- Enable for 3D dilation.
- Check to get the difference between the current and dilated selections.
How dilation is computed
- Small sizes use MATLAB's imdilate with a disk (2D) or ball (3D) element.
- Large sizes (radius above ~5 px) automatically switch to a distance-transform method. It gives an identical result for round elements but runs in near-constant time regardless of size, avoiding the extreme slowdown of very large elements.
- 3D on non-cubic voxels: a dialog lets you choose:
- Accurate — a true ellipsoid matched to the voxel proportions (physically round), but slower for large sizes.
- Fast — treats the element as a sphere; almost identical when voxels are close to cubic, but stretches along Z when they are strongly anisotropic.
- Tip: for accurate results with large sizes, several smaller steps usually work better than a single large one.
Additional controls
- : selects the color channel used for segmentation tools in the Segmentation Panel.
- : automatically fills shapes drawn with the brush tool (and eraser) after releasing the left mouse button.
- : enables 3D manipulations for image and Mask/Model layers.
- : shows the difference between original and eroded/dilated Selection layers.
- edit boxes: set the structural element size for
erosion and dilation.
- The first box is the XY radius in 3D (Y radius in 2D).
- The second box is optional: it sets the Z radius in 3D (X radius in 2D). Leave it empty (
auto) for an isotropic element, in which case the Z radius in 3D is scaled by the voxel aspect ratio. Setting the second box to0gives a flat element that spreads only within each slice.
Tool preset buttons
Three preset buttons (, , ) let you store and recall settings for the currently active segmentation tool.
on a preset button - restores the stored preset for the active tool. - Shift +
on a preset button - stores the current tool settings into that slot.
Keyboard shortcuts
- 1, 2, 3: restore preset 1, 2, or 3.
- Shift+1, Shift+2, Shift+3: store current settings into preset 1, 2, or 3.
Back to MIB | User interface | Panels | Selection and View Settings