Golgi Orientation
Overview
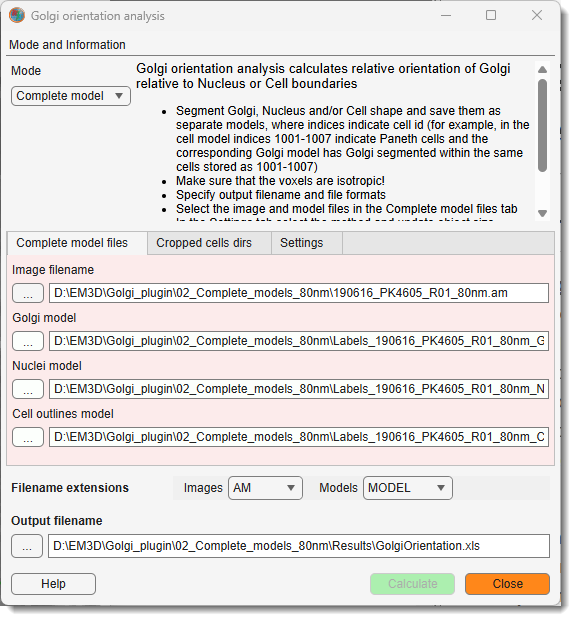
The Golgi Orientation plugin in Microscopy Image Browser (MIB) calculates the relative orientation of Golgi apparatus with respect to the nucleus surface or cell boundary in segmented 3-D microscopy models.
For each detected Golgi object the plugin computes a distance map from the reference structure (nucleus or cell boundary) and reports the standard deviation of the distance values sampled at all Golgi voxels. A low standard deviation indicates that the Golgi is concentrated at a uniform distance from the reference structure (well-oriented), while a high standard deviation indicates a more dispersed arrangement.
Results are saved as a MATLAB .mat file and, optionally, as a .csv or .xls spreadsheet.
A step-by-step video tutorial is available on YouTube : Golgi Orientation plugin tutorial
Two analysis modes are available:
| Mode | Input | Best for |
|---|---|---|
| Complete model | A single 3-D dataset with separate model files for Golgi, nuclei, and cell outlines | Large volumes containing many cells |
| Cropped cells | One directory per cell, each containing one image and one multi-material model file | Per-cell crops prepared in advance |
Launching the Plugin
Menu → Plugins → Organelle Analysis → Golgi Orientation
GUI Components
Mode and Information Panel
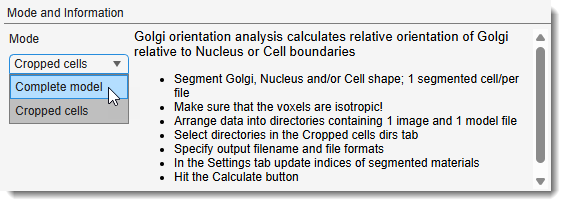
selects the analysis mode:
- Complete model — loads separate model files for the entire volume; switches to the Complete model files tab.
- Cropped cells — processes a list of per-cell directories; switches to the Cropped cells dirs tab.
The information panel below the dropdown updates automatically to show step-by-step instructions for the selected mode.
Complete model files Tab
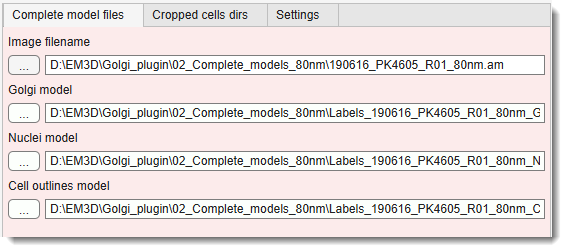
Visible when is set to Complete model.
— full path to the image file. Click to browse.
— path to the model file containing segmented Golgi objects. Each unique label index corresponds to one cell. Click to browse.
— path to the model file containing segmented nuclei (required for Relative to nucleus and Both methods). Click to browse.
— path to the model file containing segmented cell boundaries (required for Relative to cell boundary and Both methods). Click to browse.
Model index convention
In Complete model mode the label index is used as a cell identifier: Golgi object 1005, nucleus 1005, and cell boundary 1005 all belong to the same cell. Make sure the three model files share the same labelling scheme.
Cropped cells dirs Tab
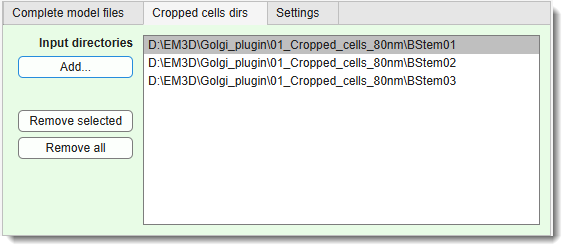
Visible when is set to Cropped cells.
— list of directories to process. Each directory must contain exactly one image file and exactly one model file matching the selected filename extensions.
— open a folder-picker dialog to add one or more directories to the list.
— remove the currently highlighted directory from the list.
— clear the entire list.
Directory layout
Each directory should hold one cropped cell with a single-cell model containing the relevant materials at the indices specified in the Settings tab.
Settings Tab
Method
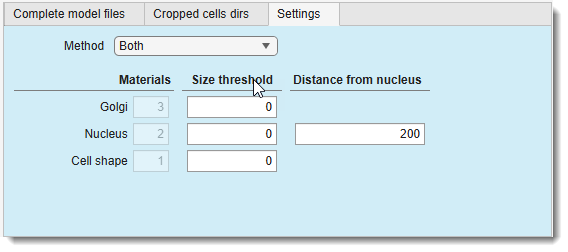
— orientation reference:
- Relative to nucleus — distance map is computed from the nucleus surface.
- Relative to cell boundary — distance map is computed from the outer cell boundary (inside-out, so voxels far from the boundary get large distances).
- Both — compute both maps and report both standard-deviation columns.
Materials Panel (Cropped cells mode only)
Spinner indices that identify each structure inside a single-cell model file:
— material index of the Golgi (default: 3).
— material index of the nucleus (default: 2).
— material index of the cell outline (default: 1).
Size Threshold Panel (Complete model mode only)
Minimum object size filters applied before analysis to discard noise or artefacts:
— discard Golgi objects smaller than this value (in voxels, default: 0 = keep all).
— discard nuclei smaller than this value (default: 0).
— discard cell boundary objects smaller than this value (default: 0).
Distance from Nucleus Panel (Complete model mode only)
— crop margin added around each nucleus bounding box
before computing the distance map, in voxels (default: 200). Increase this value if a warning
appears that Golgi voxels lie outside the cropped region.
Filename Extensions and Output

— extension of image files to look up in each
input directory when using Cropped cells mode (e.g. AM, TIF, H5).
— extension of model files (MODEL, TIF, TIFF).
— path and base name for the results file.
Click to browse. The plugin always saves a .mat
file; if the extension is .csv or .xls a spreadsheet is written as well.
Action Buttons

— run the analysis with the current settings.
— toggle the in-panel information text.
— close the plugin window and save the current settings to the MIB session so they are restored next time the plugin is launched.
Output Table
Complete model mode
| Column | Description |
|---|---|
| Cell Id | Shared label index identifying the cell |
| Golgi stack Id | Index of the detected Golgi component (as originally found by bwconncomp) |
| Golgi index | Rank of this Golgi within the cell (1, 2, …) |
| Golgi volume, units | Golgi volume in physical units (width × height × depth voxel size) |
| Golgi volume, px | Golgi volume in voxels |
| Std relative to Nucleus | Std of distance-map values at Golgi voxels (nucleus reference) |
| Std relative to Cell boundary | Std of distance-map values at Golgi voxels (cell-boundary reference) |
| Nucleus volume, units | Nucleus volume in physical units |
| Nucleus volume, px | Nucleus volume in voxels |
| Cell volume, units | Cell volume in physical units |
| Cell volume, px | Cell volume in voxels |
Cropped cells mode
| Column | Description |
|---|---|
| Directory | Full path to the input directory |
| Directory short | Directory name only |
| Dataset name | Image filename |
| Model name | Model filename |
| Golgi stack Id | Index of the detected Golgi component |
| Volume, units | Golgi volume in physical units |
| Std relative to Nucleus | Std of nucleus-distance map values at Golgi voxels |
| Std relative to Cell boundary | Std of cell-boundary distance map values at Golgi voxels |
Usage
Complete model mode
-
Segment Golgi, nuclei, and cell boundaries as separate model files in MIB. Use a consistent label index per cell across all three files (e.g. cell 1005 → Golgi label 1005, nucleus label 1005, cell outline label 1005).
-
Resample the dataset to isotropic voxels before computing 3-D distance maps.
-
Launch the plugin:
Ribbon → Plugins → Organelle Analysis → Golgi Orientation. -
Set to Complete model.
-
Browse to the image and the three model files on the Complete model files tab.
-
Open the Settings tab and choose the . Adjust and size thresholds as needed.
-
Set the and the file extensions.
-
Click .
Tip
See below the download links for example datasets
Cropped cells mode
- Segment each cell individually in MIB. In each cell's model file assign:
- material index = to the cell outline
- material index = to the nucleus
-
material index = to the Golgi
-
Save each cell as a separate directory with one image and one model file.
-
Resample to isotropic voxels.
-
Launch the plugin and set to Cropped cells.
-
On the Cropped cells dirs tab click and select all input directories.
-
On the Settings tab set the correct material indices and choose the .
-
Set and file extensions.
-
Click .
Example Datasets
Example datasets are available from Zenodo:
https://doi.org/10.5281/zenodo.21068508
The archive contains two test sets:
Cropped cells test set — three directories (BStem01, BStem02, BStem03), each with one
image (AM format, 80 × 80 × 80 nm voxels) and one model file containing cell outline (material 1),
nucleus (material 2), and Golgi (material 3).
Complete model test set — one directory with:
- one image file (AM format, 80 × 80 × 80 nm voxels)
Labels_*_CellOutlines_as_objects.model— cell outlines, one label per cellLabels_*_Golgi_as_objects.model— Golgi, matching labelsLabels_*_Nuclei_as_objects.model— nuclei, matching labels
Running the cropped-cells example
A step-by-step video tutorial is available on YouTube
- Launch the plugin and set to Cropped cells.
- Click and select the three
BStem0*directories. - On the Settings tab keep the default material indices (Cell shape = 1, Nucleus = 2, Golgi = 3) and set to Both.
- Set to a
.xlsor.csvpath. - Click .
Running the complete-model example
A step-by-step video tutorial is available on YouTube
- Set to Complete model.
- Browse to the image and the three model files.
- On the Settings tab set to Both.
- Click .
Citation
If you use this plugin in your research, please cite
Golgi organization regulates stem cell function in the small intestine
Ilya Belevich, Lucas Porcile, Agustin Sola-Carvajal, David Grommisch, Karl Annusvar, Paul Heinz, Srustidhar Das, Anna T. Webb, Simon Andersson, Nalle Pentinmikko, Eduardo J. Villablanca, James R. Goldenring, Maria Kasper, Eija Jokitalo, Robert J. Coffey, Pekka Katajisto, Sandra Scharaw
Nature Communications, 2026, accepted
Credits
- Author: Ilya Belevich, University of Helsinki (ilya.belevich@helsinki.fi)
- Part of: Microscopy Image Browser (https://mib.helsinki.fi)
Back to MIB | User Interface | Plugins | Organelle Analysis