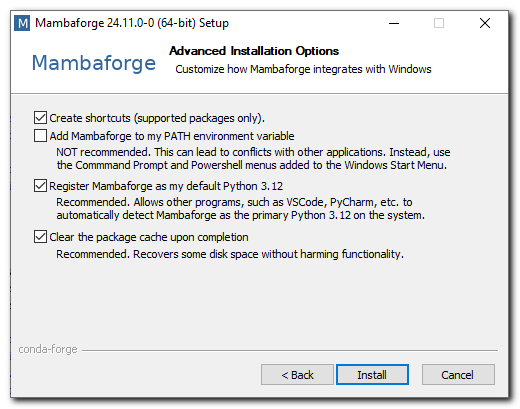
|
Computer MATLAB Toolboxes |
|
| -------------------- Optional -------------------- | |
|
Bio-Formats BMxD filters DipLib library Edge Enhancing Coherence Filter Fiji Frangi Filter Imaris |
Membrane Click Tracker Omero Server Random Forest Classifier Read NRRD Segment-anything model Supervoxels/Graphcut Volume Rendering Zarr format |
-
Nikhila Ravi, Valentin Gabeur, Yuan-Ting Hu, Ronghang Hu, Chaitanya Ryali, Tengyu Ma, Haitham Khedr,
Roman Rädle, Chloe Rolland, Laura Gustafson, Eric Mintun, Junting Pan, Kalyan Vasudev Alwala,
Nicolas Carion, Chao-Yuan Wu, Ross Girshick, Piotr Dollar, Christoph Feichtenhofer
SAM 2: Segment Anything in Images and Videos
arXiv:2408.00714, https://arxiv.org/abs/2408.00714 - MATLAB R2022b or newer (tested on R2024a)
list of Python versions compatible with various MATLAB releases - Python 3.10 or newer (tested on 3.11, version 24.5.0)
- Python environment with torch>=2.3.1 and torchvision>=0.18.1
- CUDA-compatible GPU is highly recommended, CPU can also be used but it is significantly slower
- use MIB version 2.9106 or newer that has the future compatibility flag for GPU Devices enabled
- use pytorch 2.8 with CUDA 12.9 or newer
- Installation directories: on Linux sam4mib environment was installed to
/opt/miniforge3/envs/sam4mib
and segment-anything-2 was cloned into
/opt/miniforge3/envs/sam4mib/lib/python3.11/site-packages - SAM yaml config files should be manually copied into the sam2 location, see notes below
- Youtube tutorial (SAM-2 version):

- Youtube tutorial (SAM-1 version):
- For MATLAB version of MIB
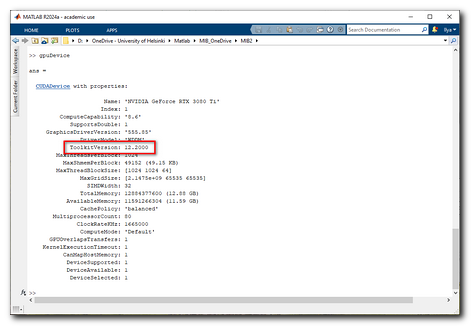
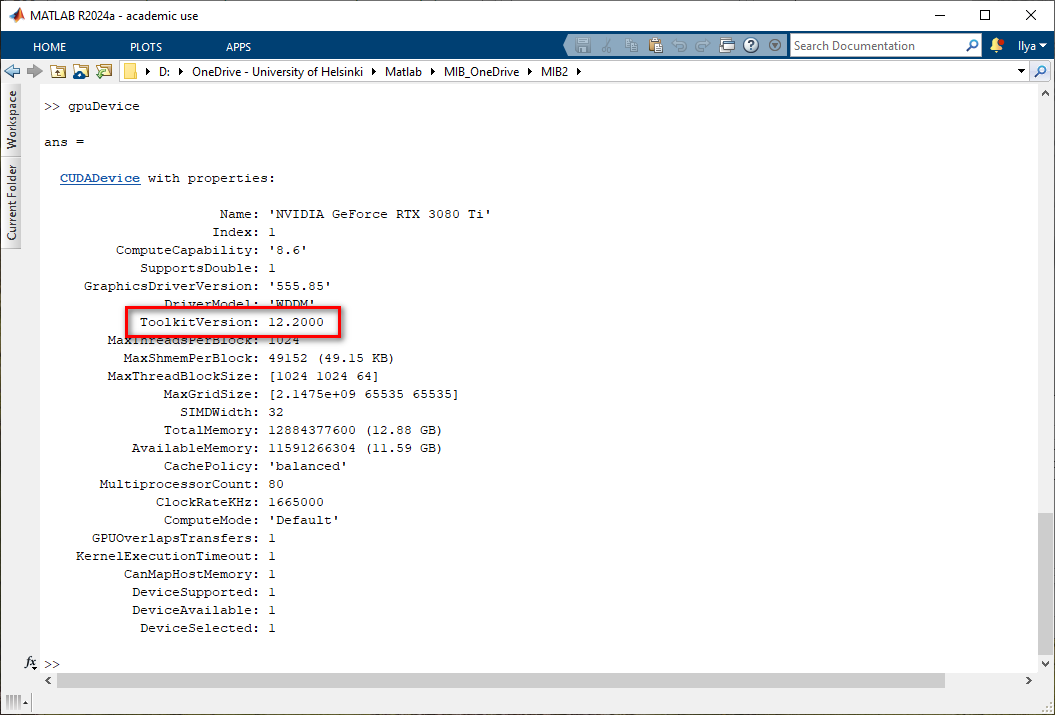
- In MATLAB command prompt type:
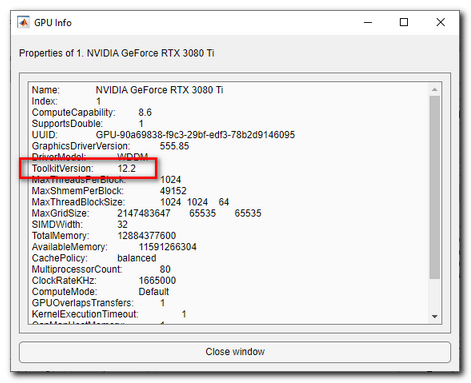
>> gpuDevice - Check the output of the command to find out CUDA Toolkit Version
- In MATLAB command prompt type:
- For stand alone version of MIB
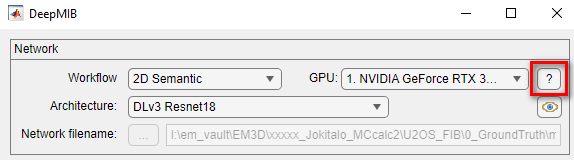
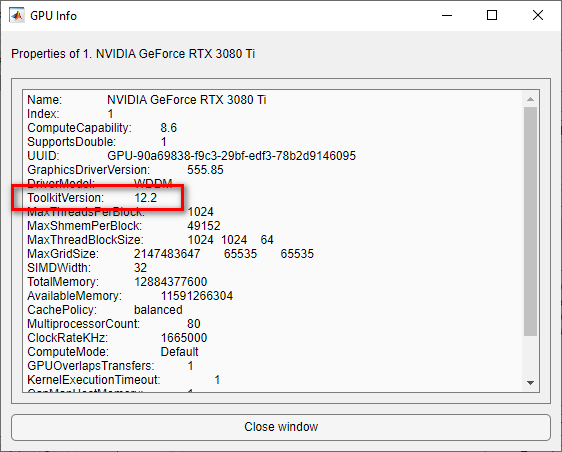
- Start MIB
- Start DeepMIB (Menu->Tools->Deep Learning Segmentation)
- Press the "?" button in the Network panel
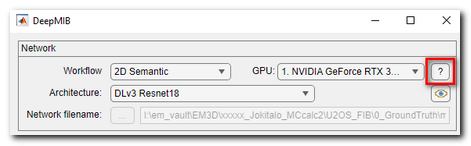
- Check the output of the command to find out CUDA Toolkit Version
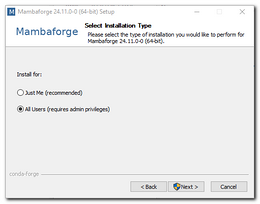
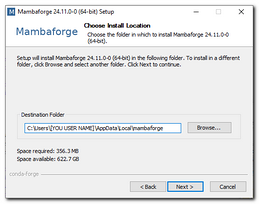
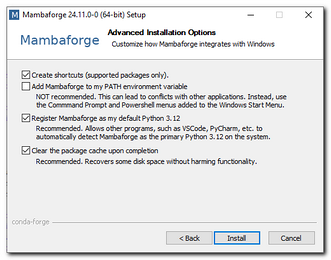
- Install Mambaforge
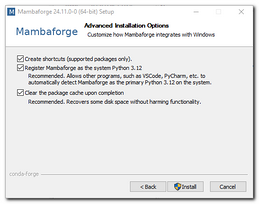
(tested on 24.11.0-0 with base Python 3.12, Mambaforge-24.11.0-0-Windows-x86_64.exe)
Archive of Mambaforge releases: https://github.com/conda-forge/miniforge/releases
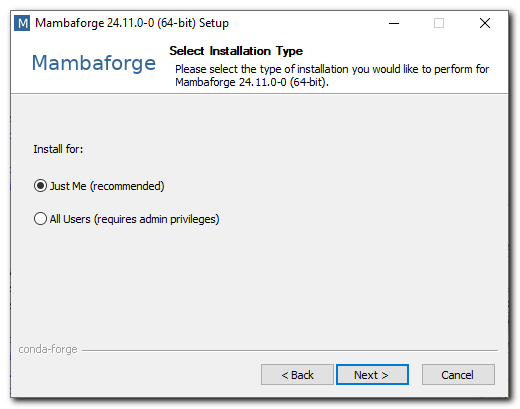
Commands below assume that Mambaforge was installed toIf you have admin account, you can install Python for all users, otherwise it is possible to install Python only for the current user.
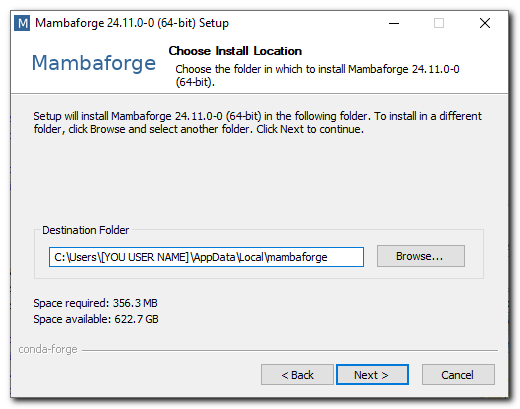
D:\Python\Mambaforge\
Adjust the path to the actual location on Mambaforge on your system
- With Admin rights
Example of the installation directory:D:\Python\Mambaforge\
Optional note!
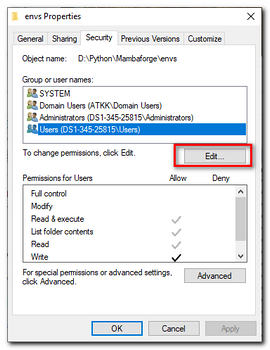
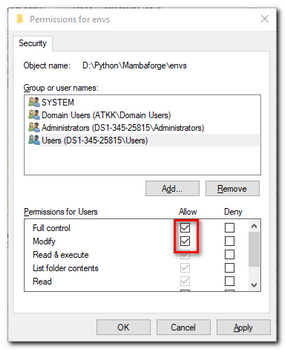
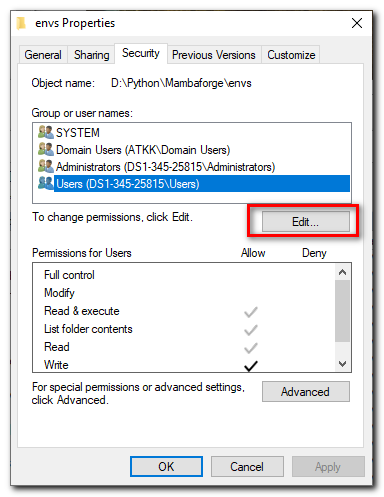
If installation was done for All Users, change permission of Mambaforge's
envsdirectory (e.g.d:\Python\Mambaforge\envs\) or the whole Mambaforge directory to be accessible for all users.
This makes things a bit more organized, otherwise the python environment will be created inC:\Users\[USERNAME]\.conda\envs\
- Without Admin rights
Example of the installation directory:C:\Users\[USERNAME]\AppData\Local\Mambaforge\

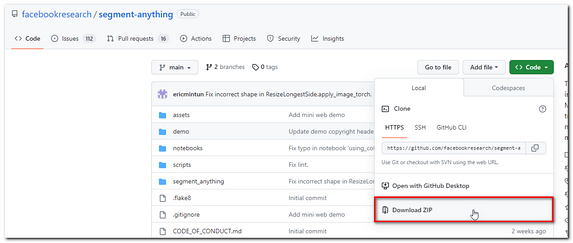
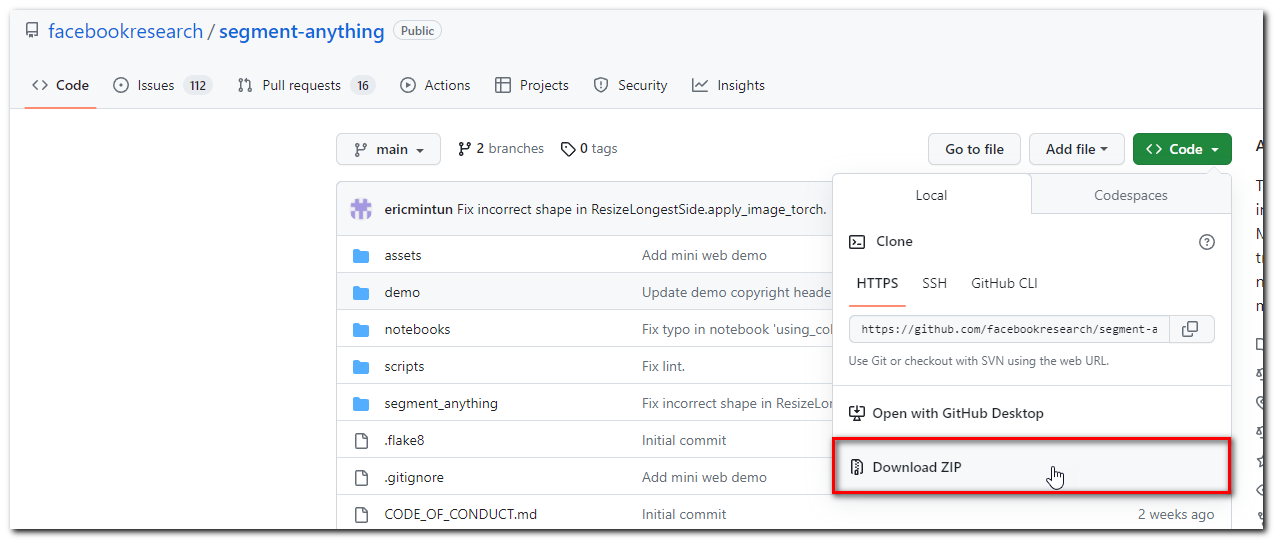
- Download segment-anything from:
forked distibution tested with MIB
- Start "Miniforge Prompt"
Start->Miniforge3->Miniforge prompt

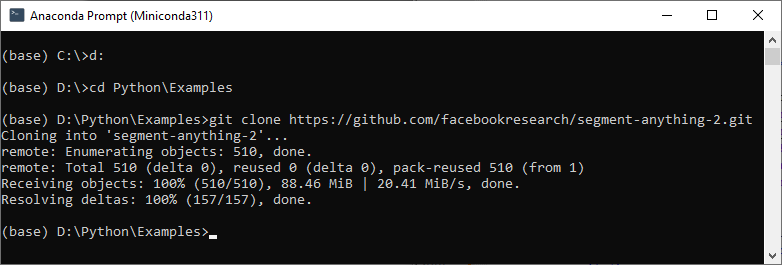
- Change directory to location where you want to download segment-anything-2, e.g.
D:\Python\Examples\ - Type:
git clone https://github.com/Ajaxels/segment-anything-2.git
to download SAM-2,
the final destination will bed:\Python\Examples\segment-anything-2\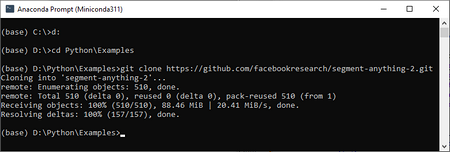
- Unzip "segment-anything-2-main.zip";
for example tod:\Python\Examples\segment-anything-2\
Full path to setup.py:d:\Python\Examples\segment-anything-2\setup.py - Create a new environment for Python with SAM
- Start "Miniforge Prompt"
Start->Miniforge3->Miniforge prompt
If you have a local-admin account use it to start "Anaconda Prompt" and add a new environment!
Otherwise, the installed environment may not be accessible to other users - Create a new environment, specify location for the environment and the version of Python e.g.:
>> conda create --prefix d:\Python\Mambaforge\envs\sam4mib python=3.11
whered:\Python\Mambaforge\envs\sam4mibdestination location for the environment.
- Start "Miniforge Prompt"
- Activate the environment:
>> activate sam4mib
For installation of SAM-2 without MIB or MATLAB follow sections at the bottom of this page
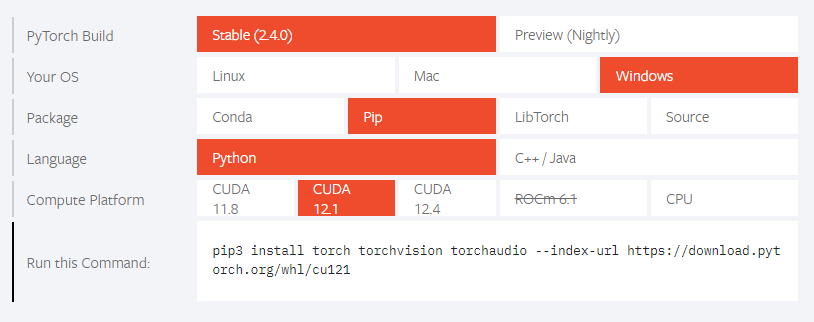
- Install Pytorch and torchvision
(torch>=2.3.1, torchvision>=0.18.1)
the instructions here to install both PyTorch and TorchVision dependencies:
https://pytorch.org/get-started/locally
- Using the possible options configure the command to install the packages
(use CUDA version that matches the one detected in the
CUDA toolkit version section):
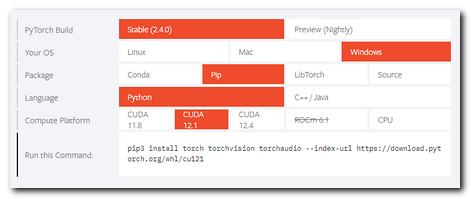
- In the command window type the generated command to install pytorch; the tested command:
(sam4mib)>> pip3 install torch torchvision torchaudio --index-url https://download.pytorch.org/whl/cu121
CUDA for pytorch may be lower than the installed CUDA toolkit version - Using the possible options configure the command to install the packages
(use CUDA version that matches the one detected in the
CUDA toolkit version section):
- Install additional packages:
- Install hydra-core:
(sam4mib)>> pip3 install hydra-core - Install iopath:
(sam4mib)>> pip3 install iopath
- Install hydra-core:
- Start MIB
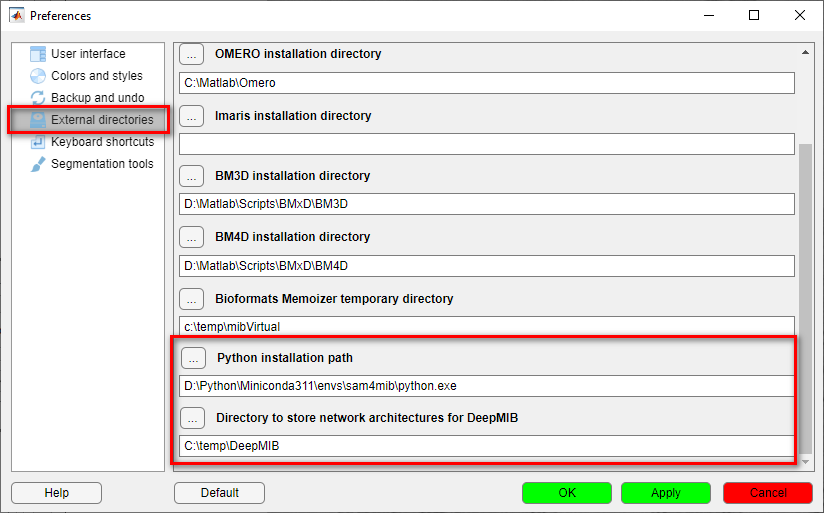
- Open MIB preferences:
Menu->File->Preferences - Define path of
python.exeinstalled in the specified environment (sam4mib):
External directories->Python installation path
For example:
-D:\Python\Mambaforge\envs\sam4mib\python.exe
-C:\Users\[USERNAME]\.conda\envs\sam4mib\python.exe
- Define directory to store network architectures for DeepMIB;
this location will be used to download checkpoints: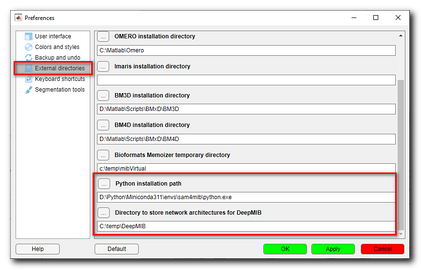
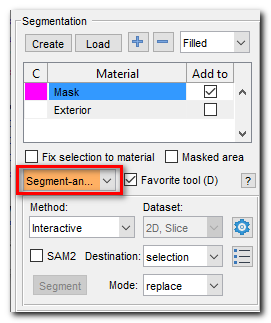
- Select "Segment-anything model" tool in the Segmentation panel:
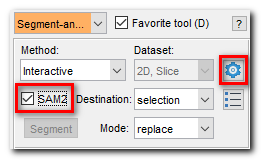
- Check the "SAM2" checkbox to enable the SAM2 version and press the Settings button:
- Open SAM settings:
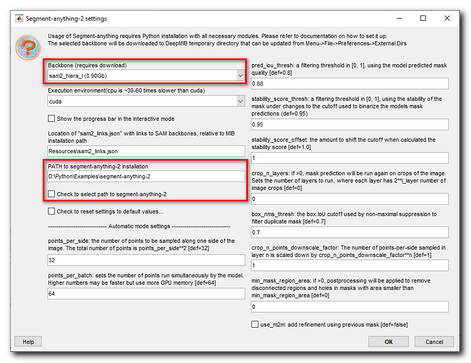
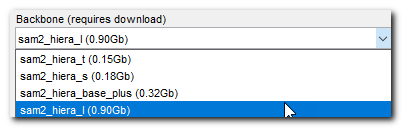
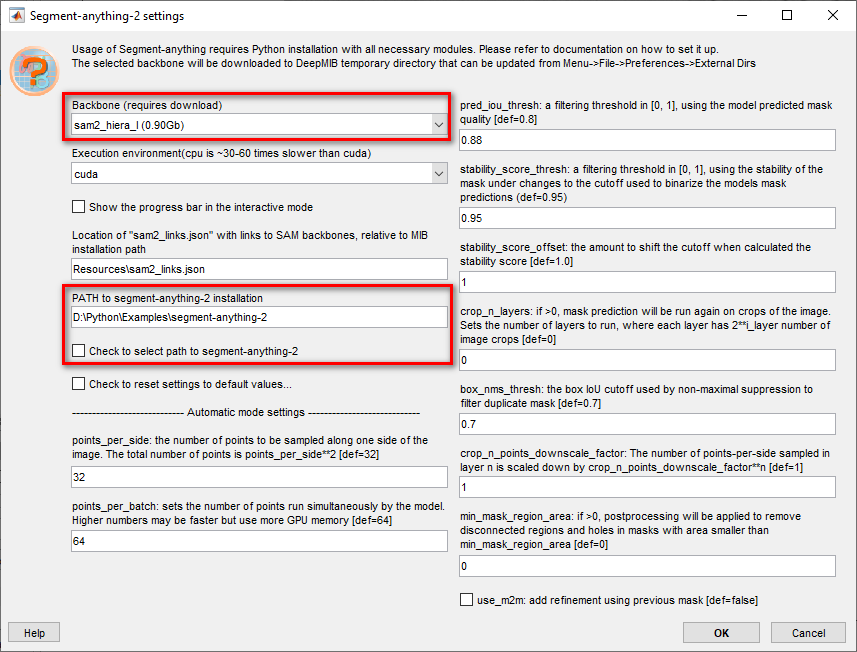
- Select the backbone
speed performance is about the same, but the largest model (sam2_hiera_l) gives the best results:
-sam2_hiera_t (0.15Gb)
-sam2_hiera_s (0.18Gb)
-sam2_hiera_b_plus (0.32Gb)
-sam2_hiera_l (0.90Gb)- recommended for best predictions
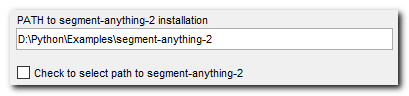
- Define location where segment-anything package was unzipped:
if you checkCheck to select path to segment-anythinga directory selection dialog will be shown
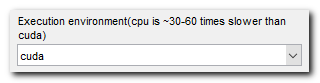
- Set correct execution environment, please note that CPU is 30-60 times slower than CUDA
- youtube tutorial (SAM1 version):
- Documentation page is available in MIB Help:
User guide->

			...GUI Overview, Panels->

			......Segmentation panel->

..........Segmentation tools->Segment-anything model - info: information about the SAM trained network
- name: name how it will be shown in the SAM configuration
- backbone: backbone name
- checkpointFilename: filename of the network file
- onnxFilename: [only for SAM1], onnx filename that is used with SAM version 1, not used for SAM2
- checkpointLink_url_1: an URL link from where pytorch file will be downloaded
- checkpointLink_url_2: an alternative URL link, in case when the first one does not work
- modelCfgLink_url_1: [only for SAM2] an URL link to the config file, that is typically located under sam2_configs directrory of SAM2
- modelCfgLink_url_2: [only for SAM2] alternative link to the config file
- onnxLink: [only for SAM1] an URL to a generated onnx file
- Activate the environment (if it is not yet activated):
>> activate sam4mib - Install opencv, onnxruntime and onnx:
(sam4mib)>> pip3 install opencv-python onnxruntime onnx - Install pycocotools:
(sam4mib)>> pip3 install pycocotools
if there is an error see below - Install "onnxruntime-gpu" to make prediction on GPU:
(sam4mib)>> pip3 install onnxruntime-gpu==1.19.2 - Start "Miniforge Prompt"
Start->Miniforge3->Miniforge prompt
- List the environments installed on your system by running the command:
>> conda env list - Remove sam4mib environment:
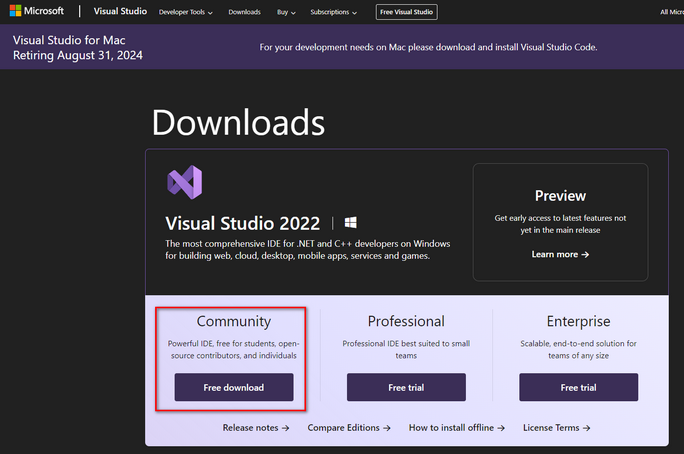
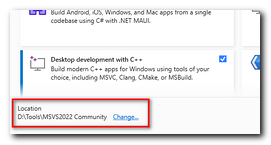
>> conda remove --name sam4mib --all - Download Microsoft Visual Studio C++ 2022 Community Edition:
https://visualstudio.microsoft.com/downloads
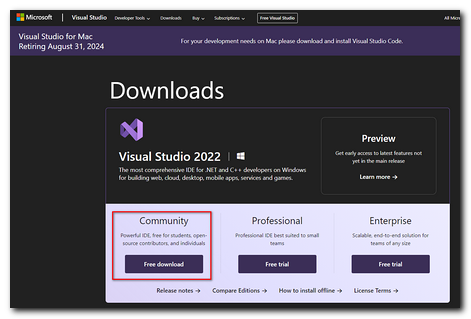
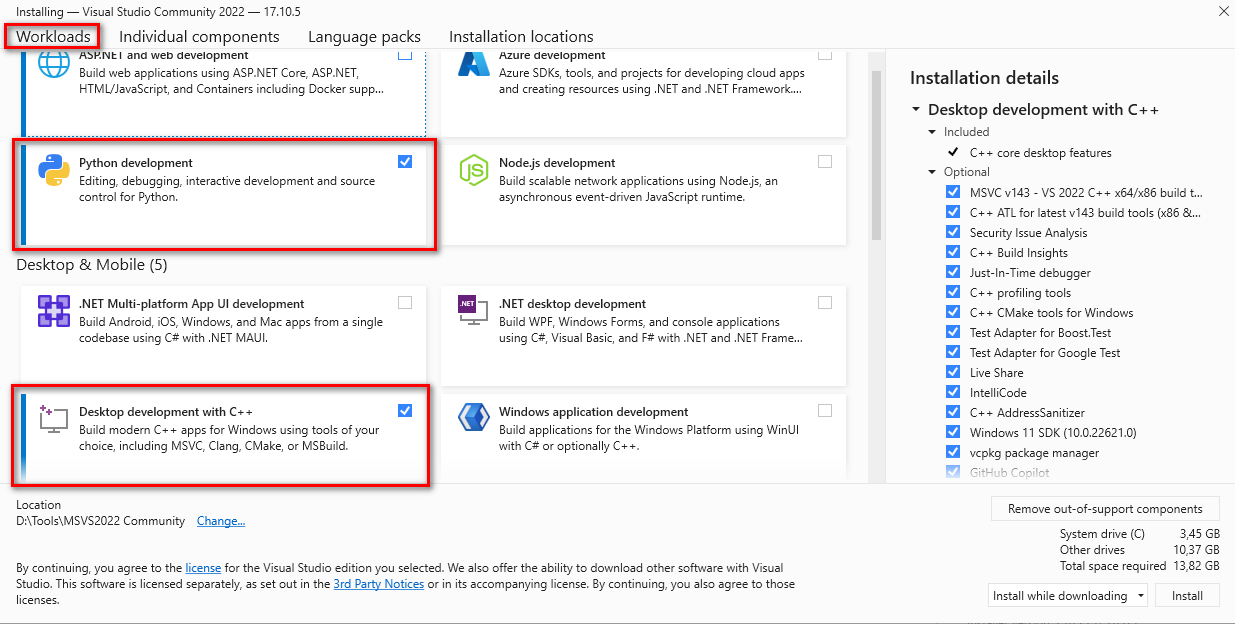
- Start installation of Microsoft Visual Studio
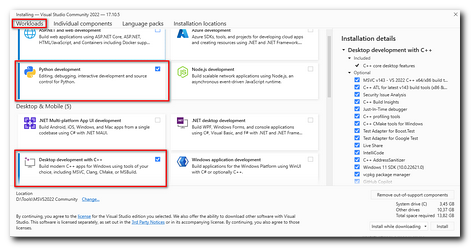
- Select Python and Desktop C++ in the Workloads
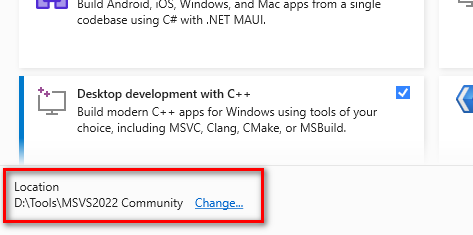
- Update the destination location to whereever you want to install it
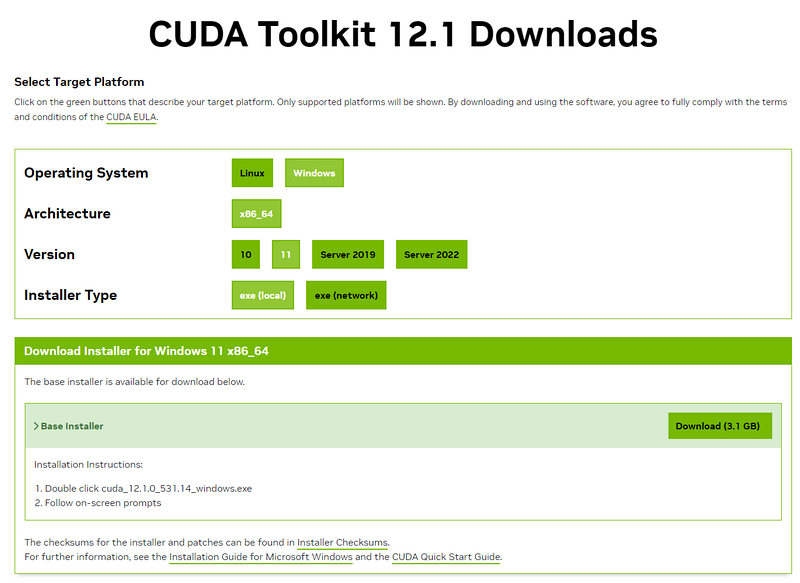
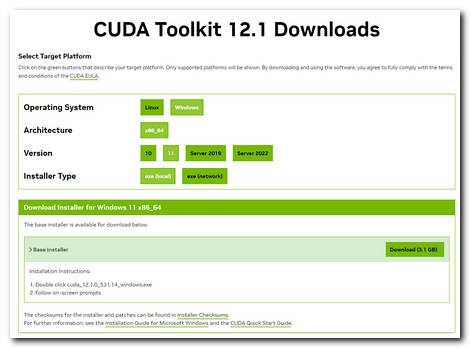
- Navigate to CUDA Toolkit Archive page and download the suitable package
(e.g. CUDA Toolkit 12.1.0 (February 2023)) - Start the installation and select the suitable configuration of options:
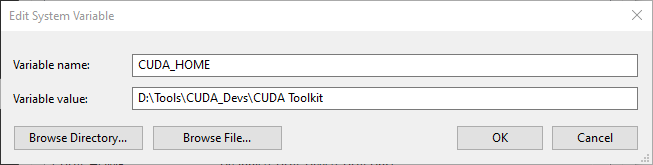
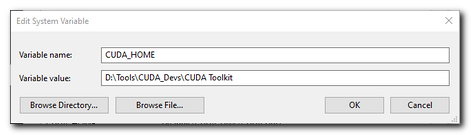
- Define CUDA_HOME Windows environment variable:
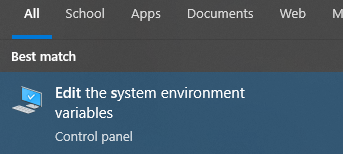
- In Windows start menu type: "Edit the system environment variables
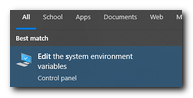
- Edit the system environment variables:
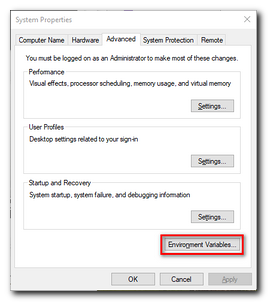
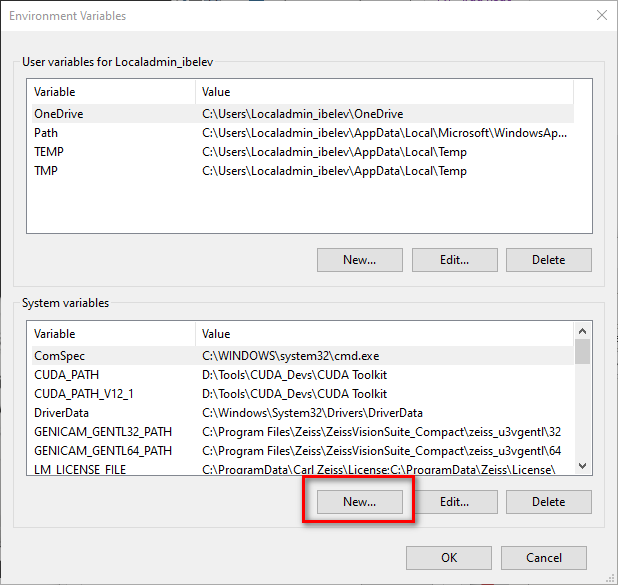
- Add a new system environment variable:
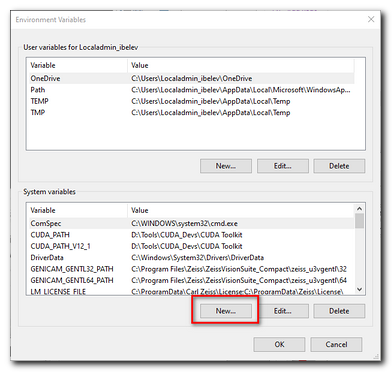
- Specify location where CUDA Toolkit was installed:
- In Windows start menu type: "Edit the system environment variables
- Do system check
- Check that the proper version of CUDA is installed and visible, type:
>> nvcc --version
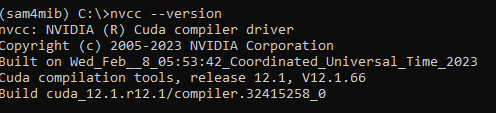
- - Check that CUDA_HOME variable is available, type:
>> echo %CUDA_HOME%

- Check that the proper version of CUDA is installed and visible, type:
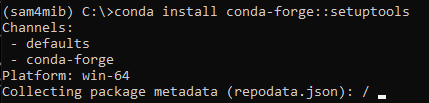
- Install setuptools:
>> conda install conda-forge::setuptools
- Install Pytorch and torchvision, as described above
- Compile required packages:
- Change directory to the location of segment-anything-2:
>> cd D:\Python\Examples\segment-anything-2\ - Start compiling CUDA:
>> pip install --no-build-isolation -e .
it should finish with successful installation of packages:

- Change directory to the location of segment-anything-2:
SAM2 marks the updated version of the model with faster and better segmentation results
(Github link: https://github.com/facebookresearch/sam2).
Details of the research is available here:
https://ai.meta.com/research/publications/sam-2-segment-anything-in-images-and-videos/
Implementation of SAM in MIB is done via utilization of an external Python interpreter, please follow the following steps to configure local python environment to work in MIB.
Important!
even though SAM can work on CPU, GPU is highly recommended as it is x30-60 faster.
Note on Nvidia 50xx series
In case, MIB can not detect modern GPU:
Comparing to Windows, there are two main differences:
SAM1 can be added with 3 additional commands as explained below, but the original SAM1 installation guide for Linux available here:
https://mib.helsinki.fi/downloads_systemreq_sam_linux.html
Installation and usage:


Using git-command instead of manual download!
If you have Git, segment-anything-2 can also be downloaded using the following git command:
Update "sam2_video_predictor.py" from facebookresearch github
The original version of SAM-2 from Facebookresearch Github
can also be used, but the "Interactive 3D" mode for segmentation of volumes will not work.
You can update sam2_video_predictor.py using these instructions: open instructions
or use the forked distribution from above.
Warning for Linux!
When doing installation of SAM2 on Linux, copy yaml config files from
[SAM DIRECTORY]\sam2\configs\sam2
[SAM DIRECTORY]\sam2\configs\sam2.1
to the main sam2 directory:
[SAM DIRECTORY]\sam2\
sam2_links.json file located in Resources subfolder in MIB installation directory.This json file can be used to specify locations to custom networks and those networks will be automatically linked and become available under the backbone section of the SAM configuration window.
An example of a section within json file that specify location of "Hiera tiny model"; use this as a template if you need to add a custom trained network
{
"info": "Hiera tiny model",
"name": "sam2_hiera_t (0.15Gb)",
"backbone": "sam2_hiera_t",
"checkpointFilename": "sam2_hiera_tiny.pt",
"onnxFilename": "",
"checkpointLink_url_1": "https://dl.fbaipublicfiles.com/segment_anything_2/072824/sam2_hiera_tiny.pt",
"checkpointLink_url_2": "http://mib.helsinki.fi/web-update/sam/sam2_hiera_tiny.pt",
"modelCfgLink_url_1": "https://raw.githubusercontent.com/facebookresearch/segment-anything-2/main/sam2_configs/sam2_hiera_t.yaml",
"modelCfgLink_url_2": "http://mib.helsinki.fi/web-update/sam/sam2_hiera_t.yaml",
"onnxLink": "http://mib.helsinki.fi/web-update/sam/vit_h.zip"
}
Description of fields:These steps are only needed if SAM-2 is planned to be used without MIB or MATLAB